
RANDOM BOXES QUILT INSTRUCTIONS

This quilt looks random and it looks like it has set in seams, but neither is the case. It is constructed modularly. That is, several different sized smaller blocks are combined to make one larger block. Then several of the larger blocks are combined to make the quilt. Here’s how you make one:
Select several fabrics. I can’t see doing this quilt in fewer than 15 different fabrics, but suit yourself. Some of the options for selection are – choose a focus fabric and then load up on everything you can find that coordinates with it; chose a color and go monochrome adding textures, hues, shades of the same color; choose a theme (floral, swirls, geometrics, polka dots, stripes…) and collect as many examples of these fabrics as you can find.
You do NOT have to have much of any one fabric. This quilt is great for using up scraps. There are no pieces in this quilt smaller than 2 1/2″ square though, so leave your crumbs in the drawer for now.
Determine the size of the quilt you want to make.

Composite Block
One composite block (shown above) is 30″ square finished. Nine of them makes a queen or king-sized quilt (90″ x 90″) Four of them make a twin or full (60″ x 60″). One with a couple of extra borders makes a darling baby quilt.
If you don’t see the size of quilt you want to make above, make a few composite blocks and make LOTS of small or medium blocks to serve as a border around them to bring the quilt up to the size you desire.
For one composite block you will need to make 4 small blocks, 3 medium blocks, and 1 large block.
large block is 18″ x 18″ finished
medium is 12″ x 12″ finished
small is 6″ x 6″ finished
to make each block you need:
large block:
2 ½” x 2 ½” square for the center
2 – 2 ½” x 2 ½” squares, 2 – 2 ½” x 6 ½” rectangles for border 1
2 – 3 ½” x 6 ½” rectangles, 2 – 3 ½” x 12 ½” rectangles for border 2
2 – 3 ½” x 12 ½” rectangles, 2 – 3 ½” x 18 ½” rectangles for border 3
medium block:
4 ½” x 4 ½” square for center
2 – 2 ½” x 4 ½” rectangles, 2 – 2 ½” x 8 ½” rectangles for border 1
2 – 2 ½” x 8 ½” rectangles, 2 – 2 ½” x 12 ½” rectangles for border 2
small block:
2 ½” x 2 ½” square for center
2 – 2 ½ x 2 ½” squares, 2 – 2 ½” x 6 ½” rectangles for border 1
If you’re going to make only one or two composite blocks you can cut everything out in advance and probably not get too confused. If you’re planning on making a large quilt or if you confuse easily, just cut strips in the desired widths (2 ½” or 3 ½”) and cut off the pieces you need as you go.
Assembly (All seams 1/4″)
Small Block:

Small Block Assembly Diagram
Right sides together, sew center 2 ½” x 2 ½” square to one 2 ½” x 2 ½” square for border 1. Press seam towards border fabric. Right sides together, sew center assembly to the other 2 ½” x 2 ½” square for border 1 on the side opposite the first seam. Press seam towards border fabric.
Right sides together, sew center assembly to one 2 ½” x 6 ½” rectangle along one long edge. Press seam towards border. Right sides together, sew the other 2 ½” x 6 ½” rectangle along the other long edge. Press seam towards border.
Medium Block:

Medium Block Assembly Diagram
First border:
Right sides together, sew center 4 ½” x 4 ½” square to one 2 ½” x 4 ½” rectangle for border 1 (this edge is now called “top”). Press seam towards border fabric. Right sides together, sew center assembly to the other 2 ½” x 4 ½” rectangle for border 1 on the side opposite the first seam (see below). Press seam towards border fabric.
Right sides together, sew center assembly to one 2 ½” x 8 ½” rectangle along one long edge. Press seam towards border. Right sides together, sew the other 2 ½” x 8 ½” rectangle along the other long edge. Press seam towards border.
Second border:
Right sides together, sew first border assembly to one 2 ½” x 8 ½” rectangle along top edge. Press seam towards border. Right sides together, sew the other 2 ½” x 8 ½” rectangle along the opposite edge. Press seam towards border.
Right sides together, sew first border assembly to one 2 ½” x 12 ½” rectangle along one long edge. Press seam towards border. Right sides together, sew the other 2 ½” x 12 ½” rectangle along the other long edge. Press seam towards border.
Large Block:

Large Block Assembly Diagram
Make up center and first border exactly like a small block.
Second border:
Right sides together, sew first border assembly to one 3 ½” x 6 ½” rectangle along top edge. Press seam towards border. Right sides together, sew the other 3 ½” x 6 ½” rectangle along the opposite edge. Press seam towards border.
Right sides together, sew first border assembly to one 3 ½” x 12 ½” rectangle along one long edge. Press seam towards border. Right sides together, sew the other 3 ½” x 12 ½” rectangle along the other long edge. Press seam towards border.
Third border:
Right sides together, sew first border assembly to one 3 ½” x 12 ½” rectangle along top edge. Press seam towards border. Right sides together, sew the other 3 ½” x 12 ½” rectangle along the opposite edge. Press seam towards border.
Right sides together, sew first border assembly to one 3 ½” x 18 ½” rectangle along one long edge. Press seam towards border. Right sides together, sew the other 3 ½” x 18 ½” rectangle along the other long edge. Press seam towards border.
Assembling the composite block:
Experiment with layout until you are happy with the design and color combinations.

Composite Assembly Step 1
Right sides together, sew blocks A and B together. Press seam.
Right sides together, sew blocks C and D together. Press seam.
Right sides together, sew blocks E and F together. Press seam.

Composite Assembly Step 2
Right sides together, sew blocks AB and EF together as shown. Press seam.
Right sides together, sew blocks CD and G together as shown. Press seam.
Right sides together, sew blocks CDG and H together. Press seam.

Composite Assembly Step 3
Right sides together, sew blocks CDGH and ABEF together as shown. Press seam.
Once you’ve built all the composite blocks you want to use, assemble them in rows and then assemble the rows to each other to make a top.
Comment here or at my blog, quiltifications with a picture of your quilt when your top is complete and I’ll post a picture of it for the wwweb to admire!
UPDATE: I have two random boxes to show you – first a detail from Babs, she made hers in pinks:
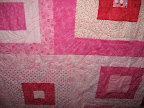 |
| From Quiltifications |
and next, BETH sent me a picture of her gorgeous multi colored random boxes:
 |
| From Quiltifications |

Looks Great! I’m getting back to working on mine this week.
Wow! Great write-up. I’ve had a few people ask for the pattern and I’ve sent them to you but this is wonderful. Thanks for sharing.
Thanks for sharing the pattern!
I was thinking of a variation where you use the center squares to introduce a theme i.e. flowers, animals, letters etc for a child’s quilt.
I can’t wait to start this quilt. It is just so do-able and has so many possibilities for exchanging fabric strips with other quilters for added variety. I think that this will be my president’s challenge quilt for my guild. Even our new members should be able to handle it. Can’t you just imagine over 50 quilts in every shade and hue at our June meeting?Many thanks for sharing.
I love this pattern – it is just beautiful.
Thank you so much for posting this pattern. I’m working on a Christmas quilt right now and have been searching for just the right pattern to do a pieced back in fall colors so it can be a true “holiday quilt.” This is it!
Fabulous pattern- thanks for creating such a great tutorial.
Perhaps I will get a chance to try and make it.
Regards,
Anna
it looks like this is a QT, how was it quilted & do you have a finished pic? thanks
A
Has anybody had a problem coming up with an 18 1/2″ square on the large size. Mine came out 18 ” by 1 8 1/2, I’ve got to add another half inch some where for seam allowance.
Glad I didn’t cut out everything ahead of time.